WELCOME TO KIOS MADINAH 3NGLISH VERSION AT HTTP://KIOSMADINAH3.BLOGSPOT.COM


Showing posts with label How To. Show all posts

Tuesday, April 24, 2018

How to Type Arabic Text on Android Phone


Hi guys,
All of Kios Madinah Lovers wherever you are!
On this good occasion admin will share a post on Label: Mobile and How To, entitled:

HOW TO TYPE ARABIC ON ANDROID PHONE. 

Generally, we find the Arabic writings in social medias, messenger, BBM, WhatsApp, etc. They were used as profile names, statuses and even someone's personal messages as shown in the screenshots below.


For the people who used to type Arabic every times certainly does not feel foreign with that. But for my friends who never tried that possibly be wondering; How to star it? How and how
Okey, to start Arabic typing or making Arabic text is not too difficult, but vice versa, it is very easy even more simplified.

This was caused the features availability on smart phones and gadgets. Almost all smart phones and gadgets provided that feature, not least Samsung Mini Prime, which that smar phone type was referred by admin take as sample for typing Arabic text on Android smart phone. 

So guys, if your smart phones are not the same brand and type as that, please make an adjustment, especially on the placement settings as will be presented later.

Okey, considering the possibility between Kios Madinah Lovers who want to know how to type Arabic text on Android smat phones, admin will describe the ways as follows:

1. Open your favorite Android phone

2. Find and Click "Settings" (wheel icon)


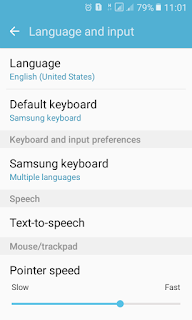
3. Find and Click "Language and Input"

4. Select "Samsung Keyboard"

5. Click the + sign "Add input language"


6. Find and select "Arabic" ( sometimes need internet connection )

7. Save settings

8. Done

Now your smart phone is supporting Arabic input / input and automatically installed the default Arabic font to your Android smart phone.

After that, you can start typing Arabic text. You can try by making an SMS with Arabic input or WhatsApp messages with Arabic text.

For example as the following:

1. Open WA as usual 

2. Start creating a message / chat 

3. Activate the Arabic keyboard by replacing the input of the origin language that appears in the space bar ( keyboard) and then move ( slide ) left or right while pressed so that Arabic input is displayed and the keyboard view as the main picture above.

4. To give a harakah to Arabic letters, select in the dot (.) button on the right side of the spacebar. Then select the best available and most suitable of harakah that you need.

5. To return to previous language input please repeat the way number 4. 

6. For Android phone which doesn't provide features as above, download "Arabic Keyboard" in App or Play Store as alternative then install and activate it. 

7. Done

Thus the post How to type Arabic on Android phone, may be helpful and useful for us all. Okey, Happy typing Arabic text, thanks. And see you.

Thursday, November 19, 2015

How To Make Emergency Lights Powered By Laptop

Hi Guys, on this auspicious occasion, admin re-share a post with the label " How To " with the title:

HOW TO MAKE EMERGENCY LIGHTS POWERED BY LAPTOP

Emergency lights or emergency lamp was often needed when electric power was failure or when you want to find something in the dark. This lamp types and brands already circulating in the market from small to large and from cheap to expensive. The marketing system was also assortment from beeing displayed in the window electronics store until being peddled door to door and from paying by installments until to cash.


That indicates that the emergency lamp is very important to be owned in each house at least one lights for used in emergencies. But what if the one lamp that we own turned out to be broken and has not had time yet to buy a new one? Or existing new but broken lamp still unemployed?

Okay, while searching for answers to the above questions, here the admin will share how to make the emergency light that really emergency but very useful especially when a sudden electric power failure and no generator or alternative of electric power source. While the existing emergency lights were low battery and intractable to be charged. While one new lamp would be brought our children to learning group. Fortunately laptop battery power indication with 77% remaining. Wow!

Facing such that situation, while the work being piled up, we may not dissolve in aggravation and despair. But it would be nice if we apply the method to make emergency light powered by laptop as will be described later.

Before making a circuit lamp, materials to be prepared include:
. Broken emergency lights (so long as LED lights still good)
. Screwdriver (size appropriate casing bolts of lamp)
. USB socket ex-mobile phone charger or unused data cable

And among term used as shown in this picture:


Then,  do as following:
1. Remove the screws on the lamp casing
2. Open the casing carefully
3. Find both minus and plus cables are connected to the feet of LED lights and ignore the other cables
4. Take USB socket, ex-mobile phone charger following the wire then cut the end part (cut the socket to mobile phone)
5. Connect the black wire on the USB to the minus cable or foot of LED lamp, while the red wire to the plus cableor foot  of LED
6. Ignore the green and yellow wires of the USB cable
7. Arrange the wire connection in order to avoid short circuit
8. Close the casing emergency lamp and replace the screw-bolt
9. Connect the socket USB into the USB port of a laptop
10. Done

Okay, enjoy the brightness of emergency lamp using laptop power. And survived to continue the work.

Additional:
. To freshen up a connection of circuit, should we use solder (when electric power is on)
. To save battery power of laptop, should we use LED lights at sufficiently (do not connect all of them or try to use the appropriate resistor)
. LED lights that may remain, can be used as a second emergency lights etc., are arranged in parallel
. For about casing of second emergency light etc., can be modified depend on desire
. To switch on emergency lamp can also use the power bank or mobile battery or digital camera battery or 2 batteries of clock / remote arranged in series, or other batteries with has power between 3 to 4 volts (appropriate to the amount and voltage of LED lights are used ).

That sharing of admin to buddy-buddy KM everything, may be helpful. Okay, thank you and see you at another time. Insha Allah.

Wednesday, December 17, 2014

How To Photocopy Back And Forth On Printer

Hi Guys, on this auspicious occasion, the admin come back again to share a post with the label "How To" with the title:

HOW TO PHOTOCOPY
BACK AND FORTH ON PRINTER
(to be applied to the printer Canon MP 237 or similar)

How to Photocopy on Printer? Here will be described more detail how to photocopy
back and forth ID card, driving license, ID Cards, Employee Cards, Student Card or the Similarly, the way is different from the common photocopy  to F4 or A4 sized documents such as diplomas and certificates.

Yes, to photograph the copy back and forth cards as above is required
more accuracy  and enough experience or frequency of trying. Because if being is not, then the result of a copy will be contiguous or overlapping and in essence that is failing. And what is the solution?

Maybe these ways below as the answer, besides to the other that more professional and educational. Okay, the following are the
ways to copy of ID card back and forth on printer:

1. Tur on printer by plugging the printer power cable to stop contact and then press the "POWER"
2. Open the lid (bonnet) at the top of the printer
3. Enter a blank paper (paper back-up)
4. Open a middle cover (hood scanner) on the printer
5. Put dawn ID card on the top left side, faced to the left, then copy (front side will be copied faced to down), and then close the hood to make the results are clean.
6. Press the "BLACK" to copy a black copy and press "COLOUR" to copy a color copy.
7. Wait for process. (For black copy just in seconds, but for color copy can be up to a few minutes)
8. Enter again (paper) of copy results with a blank page in the front position, and faced down (part of paper contains an existing of copy results included first)
9. Invert the ID card (the original ID card that is still in the printer to process a copy of the back side), and move its location on the lower left side, faced to the left, and copy it again.
10. Good Luck

That sharing of admin, may be helpful and success always be with us. Amen. Okay, see you in the future with the latest postings. Insha allah.


THANK'S FOR READING "HOW TO COPY BACK AND FORTH ON PRINTER"

Wednesday, November 12, 2014

5 Problems Found On BB And How To Solve Them

Hi Guys, on this auspicious occasion, the admin come back again to share a post with the label "How To" with the title:

5
PROBLEMS FOUND ON BLACKBERRY AND HOW TO SOLVE THEM

(To be implemented on smart phones BlackBerry (BB) 9000 or equivalent)

1. Camera Not Working

BB camera will not function if there are some applications opened simultaneously, or because of the large files that are opened by zooming
which the two of them require the sufficient memory availability. And if memory availability can not be sufficient, then the camera will not function as properly.

To restore the function of the camera can be tried by restarting the smart phone by pressing: alt + right shift + del simultaneously or disconnecting the battery for a temporary time.

2. Can not Receive Files Via Bluetooth


If the BlackBerry smart phones can not receive files via bluetooth or this device can not be detected, the first possibility is caused the Media Application not ready to accept the shipping of file because it has not activated. And the second possibility, namely because there are too many bluetooth devices are attached to that smart phone.

While to activate it, select Media or picture
on the home screen or in a different folder, > Press Menu> Select Receive By Buetooth> Let the message "File Transfer Waiting for Connection" until the files are sent and follow the next message.

Then, to remove
bluetooth devices, select Manage Connections (on the home screen or in another folder)> Select  Buetooth Option (after Buetooth activated)> Remove unneeded devices. completed

3. Event Log Stubborn

Event Log stubborn can happen when we browse the internet using a heavy
browser performance. As a result, slow loading, BB heat up quickly, and the hourglass icon appears. To overcome that problems are removing the Event Log by clicking the "alt + LGLG" and then press "Menu" and select "Clear Log".

But if it is not giving results or still always appear Cache / Warning in Event Log, even restarted by removing the battery was already done, then you should immediately to do the following manner in order that BB was not hot and browsing
back to normal again. Okay, the manners are likes below:

Wait until the hourglass icon is missing> Close bowser> Clear Event Log as way over the top. After that, open another browser> Select Menu> Select Stop> Reselect Menu> Select Options> Select> Cache Operations> Clear History, Cache Content, Content Push Cookies and Cache. Done.

If the cache still always appears, then clean the memory by: Select Option (on the main screen or in another folder)> Memory> Menu> Repair> Yes. completed

4. BB
Heats Improper

In addition to the problems mentioned above, sometimes the
BB Heats Improper. Finally, we become sad or frantic although only a moment. This problem can happen accidentally or because we're wanting a good signal in our place so that we change the mode 2G to 3G.

By fiddling with that mode can cause
BB Heats Improper and the battery can be drained although unused. Actually the battery is drained it is unused, but actually, the smart phone uses the energy of battery to always get a weak 3G signal at our place. That needs so much of energy and makes heat  BB Battery. To restore the hot BB should do the following:

On the home screen or in a different folder, select Manage Connections> Select Mobile Network Options> Change the Network Mode to 2G> Close / Done.


5. Can not surf without BIS


To activate the surfing on a BlackBerry without Blacberry Internet Service (BIS) should enable another surfing package first. Because if not, then we will be subject to the normal internet rates. Package apart BIS is different depending on the mobile operator to provide, but here will be reviewed on a regular surfing package using the BB default browser.

This package is relatively cheap because of its facilities is only limited to browsing. No chating, No BBM, No Social Networking. It's suitable for  whom likes browsing only or whom are not payday yet?! Okay, to be able to surf without BIS, please read the following:

On the home screen or in a different folder, select Browser (default Browser)> Select Options> Select Browser Configuration> Change Internet Browser Wap providers> home page address: replace to the address of the service provider's site (according to the SIM card used) Save.
Then on the General Properties (
below of Browser configuration)> Change the Default Browser to Internet Browser Wap Provider (according to the card used).

That's sharing of admin for KM blog lovers, may be helpful .Oke, see you later. Insha Allah.

Sunday, November 9, 2014

How To Scan Document With Printer

Hi Guys, on this auspicious occasion, the admin re-share a post with the label "How To" with the title:
 

HOW TO SCAN DOCUMENT WITH PRINTER
(to be applied on the printer Canon MP 237 or equivalent)
 

To scan documents are indispensable for us who want to send a copy of the complete data with the signature and seal via email or otherwise. It could also be required to send the scanned document of valuable files, such as family card, marriage certificate, ID card etc. to family or work colleagues who are far away.
With a scanning first, then the copy of the document will be formatted 'pdf', (it's can also be converted to other formats with the 'help' of other applications) that eventually can be sent via email.  


Okay. Caused the title of this post is about how to scan documents with Canon MP 237 printer, then just as the way we see the following:
 
1. Turn on the printer while plug in cable to electricity and pressing the "POWER"
 

2. Open the top lid of the printer
 

3. Insert a blank paper (paper backup)
 

4. Open the middle cover on the printer
 

5. Place the document to be scanned in the inverted position (the page will be scanned face down).
 

6. Click the icon 'scan a document' on the computer screen or laptop so scan selection window appears (if not, click start> all programs> Canon Utilities> scan utility)
 

7. Scan the document (click on the document to scan documents)
 

8. Wait for the process so that the folder window appears containing the results of the scan
 

9. The file is ready to be open
 

10. Done.

Now the scanned of the document pdf format was ready to be delivered. Then to scan a photo, look at point number 7 (click photo) to get the
good results .
 

That's sharing of admin with the title: how to scan documents. Okay, I hope this is helpfully. See you at another time. Insha Allah.

THANK'S FOR READING "HOW TO SCAN DOCUMENT WITH PRINTER"

WATCH VIDEO HERE

Sunday, April 13, 2014

How To Find Files In Computer Quickly

Hi Guys , on this auspicious occasion , the admin re- share a post with the label " How To" under the title :

HOW TO FIND THE FILES IN COMPUTER QUICKLY
( For applying to Computer , Laptop , Notebook, or PC OS Windows 7 and similar )

Maybe you ever confused to find document files that saved on the computer before, while the file is needed immediately. To look it at various folders , no found. To type it again , eventually . To  find the physical file , too hard . So what's the solution ?
Okay , for you that is going through a state as described above , it is better if you read the below.

To find the new opened document;
1. Click Start
2. Highlight Microsoft Word or click Triangle Sign
3. Discover the document title ( in the right bar )
4. Highlight the title to find out the location of the file is stored . Or ...
5. Click to open it directly
6. Completed

To find the old document;
1. Click Start
2. Click the Document ( in the right bar ) if the file is stored in plain Local Disk C. Or ....
3. Click on My Computer if documents are stored in plain the Local Disk D
4. Click the Search tab ( in the upper right corner)
5. Type the name of the document title ( fuller title is sooner found )
6. Wait for the automated search process
7. Right click > properties > ff . to know the location of the file is stored .
8. 2x left click to open it directly
9. Completed

To find other document files ;
1. Click Start
2. Click on My Computer
3. Click Search Tab
4. Type the title name or format , eg mp3 or mp4 or 3gp or avi etc. .
5. Wait for the automated search process is completed
6. Click to open
7. Completed

That is sharing of the admin , may be helpful . And , see you later. Insha Allah .


Thursday, March 27, 2014

10 Ways To Overcome The Slow Surf In BlackBerry

Hi Guys, on this occasion , the admin re- share a post with the label " How To " with the title :

10 WAYS TO OVERCOME THE SLOW SURF IN BLACKBERRY

There are 10 ways to cope with the problem of slow surf on blackberry ( BB) which will be shared on this occasion. These methods can be applied one of them or all of them depend on a kinds of bad surf connection problems.

Yes, for you who are experiencing, it could not hurt to try the ways below. But for you who have been knowing the ways, share in the comments is also not refuse. Okay, let's go the ways!

1. Clear the cache on your browser

Menu> Options> Cache Operations> Clear Menu> or Settings> Personal> Delete Cookies.

2. Clear data usage
Menu> Help> Data Usage> Reset. ( resetting the data usage can lead to lost passwords in memory browser but not on the account. In other words, the data include our passwords still remain intact but we have to re-type the password when we want to log in again because it had been reset. 

3. Force loading
When loading a page so slow, press and hold the "sym" which located on the right of the space bar.

4. Clean the Event Log
In normal conditions the origin of the screen, press the "alt" while press LGLG> click menu> clear the Event Log

5. Close / Exit Browser
When loading too long and getting tired of waiting, click menu> exit / close. After a moment, open it again.

6. Turn off all connections
On the home screen or in a folder, select "Manage Connections"> Turn off all connections. About 5 seconds later turn it on again (Restore connection).

7. Change the Network Mode
On the home screen, possibly in another folder, select "Options"> Mobile Network > Network Mode; switch to 2G> Network Mode Choices; switch to manual > or inversely (
while Roaming and Data services remain "Live". 

8. Use light browser
The browser also determine the speed of the internet connection. So that, choose the type of browser that supports to your BlackBerry type and low capacity.

9. Change Package
Internet service package of mobile operators also need to be considered. To just try, no harm if you 
register daily package first. 

10. Choose a time
Usually the rush hour of internet connection on most people relaxed. So around 6 pm to 10 pm, not infrequently the connection interruption will come because so many peoples use the internet simultaneously. At this hour we should not load heavy pages or by turning off the image to load fast .

That is sharing of the admin , may be helpful . And , see you later. Insha Allah .

Monday, March 24, 2014

How To Download Images Via Opera Mini 7.1 Using BlackBerry

Hi Guys, on this occasion , the admin re- share a post with the label " How To " with the title :

HOW TO DOWNLOAD IMAGES VIA OPERA MINI 7.1 USING BLACKBERRY

This way to be applied to opera mini browsers version 7.1 using the BlackBerry as an OS or devices. This method as a solution or an alternative for you who also had difficulties experienced when downloading images that are usually easy, by simply pressing approximately, 2 seconds ago we already save/download images we want. But if a BlackBerry device by the browser Opera Mini version 7.1  that is used or similar , then also used the specific card , possible then we always fail to download .

And what are the solutions? Well , immediately do as follows:
  1. Go to page pictorial
  2. Click on image
  3. Press the picture to get a window option
  4. Select " Open Image "
  5. Select " Open "
  6. Wait for BB default browser is finished loading the image
  7. Press " Menu "
  8. Select " Save"
  9. Completed
To open the picture , press menu > move apps > screen home > pictures > all images . Or use a way of your self or  many other shortcuts to open image

Of course , it also can create to download file not only images .

That sharing of the admin , may be helpful . And , see you later. Insha Allah .

Monday, March 17, 2014

How To Activate The BlacBerry Internet Service

Hi Guys, on this occasion , the admin re- share a post with the label " How To " with the title :

HOW TO ACTIVATE THE BLACKBERRY INTERNET SERVICE ( BIS )

Got a smart phone such as blackberry ( BB ) sometimes becomes a matter of pride , especially for who have or buying a new BB . Proud because of his dreams achieved or because the item may be considered a luxury goods in the region .

Nevertheless , it was still pride when services are provided and the applications offered have not been optimally utilized and maximized. One of them is the Blackberry Internet Service ( BIS ) . With BIS , the smart phone can access the Internet freely , as appropriate social networking , chat with Black Berry Messenger ( BBM ) as much, and much more . But if not , then the smart phone is like a regular mobile phone .

Yes , to activate the BIS as referred to above , of course there are the stages of its stages . And its phases are please read below;

1 . Insert SIM card .
2 . Wait the BB to finish loading .
3 . Register a SIM card in the BB package desired . ( If there is still not a destination package, it is better to choose the daily BB package first . )
4 . Wait for an SMS reply from the operator stating that the BIS service has been activated .
5 . Remove the battery and plug the BB for a while longer . ( This serves to restart the BB and update the applications reserved for subscribers BB package . This also applies to existing customers who had stalled the validity period of the package . )
6 . Wait BB to finish loading .
7 . Open the application . ( Can be in the folder " Applications " or " Downloads " or in " home screen " . )
8 . Wait applications by loading until completion .
9 . Enjoy the BIS service .

That sharing of the admin , may be helpful . And , see you later. Insha Allah .

Tuesday, March 11, 2014

How To Send File Between Mobile And BlackBerry Via Bluetooth

Hi Guys , on this auspicious occasion , the admin re- share a post with the label " How to " with the title :
HOW TO SEND FILE BETWEEN MOBILE PHONE & BLACKBERRY
The ways below to send a file from Mobile to BlackBerry (BB) or inverse by using bluetooth . It's deals with how to send files between mobile and laptop such as the admin share on some time ago and also can relate in a way to send files between BB and laptops that can be developed to find out this way and that before.
Then for you who's looking for this way, welcome to read and follow the ways as below. But for you who wants to share on this subject, welcome to write a comment in the box . Okay .
❶ . To send files from the mobile to the BB , do the following :
1 . Open the BB and the folder " media " or one of them , such as " image " or " music " or " videos " or other media .
2 . Press " Menu "
3 . Select " Accept by blue tooth "
4 . Let the window " waiting for file transfer connections " stand by .
5 . Send the desired mobile file at that time .
6 . Attach mobile and BB with the same code . ( Ignore this step if the number of the devices have been paired before. )
7 . Thank file by clicking "Yes " or enter.
8 . See earlier results file in the folder " images " or in another folder .
Constraint fails
1 . Window " waiting for file transfer connections " too long for stand-by .
2 . In the second delivery file , not click " Accept by bluetooth "
Solutions
When the window appears " waiting for file transfer connections " , the file should be sent .
2 . In the second delivery file . , Do again the way numbers 1 through 4 above .
❷ . To send files from BB to HP , do as following :
1 . Activate bluetooth on mobile
2 . Open the file of BB to be sent to mmobile
3 . Press " Menu " .
4 . Select " Send by Bluetooth " .
5 . Select " Yes " ( to enable bluetooth and search for devices . )
6 . Pair the two devices with the same code . ( Ignore this if these two devices are paired before)
7 . Select the desired device name .
8 . Wait until the process is complete
9 . See the files in the folder "Received files " or " File received " .
Constraint fails
1 . Bluetooth devices have not been paired or fail
2 . Bluetooth in mobile is not active
3 . Bluetooth in mobile is not visible
4 . Mobile storage file has not been modified in memory card ( external )
5 . The size or format of the file to be sent to its HP does not support it .
Solutions
1 . Bluetooth devices must be paired with the same code .
2 . Bluetooth in mobile should really be active so there is icon blootooth
3 . Look at the bluetooth settings are visible ( visible ) or not
4 . Look at whether the bluetooth settings on the phone or on the storage card memory . This might happen if the capacity of the phone memory ( internal ) is limited .

That sharing of admin for you . Okay , hopefully useful and I'll see you at another time . Insha Allah .

Friday, February 28, 2014

How To Diagnose The Printer

Hi guys, on this opportunity, the admin will share a post with label "How To" under the title:

HOW TO DIAGNOSE THE PRINTER

This method is a follow up of how to install the printer as admin wrote on the previous post. This method is done to find out if there is a problem with a printer or to find out if the printer is actually connected to the laptop PC / computer or not. In addition, it must be done in a state of the printer is turning on and connected to the laptop / PC / computer.And if not, then the screen will display a message window that mean the printer can not be detected (the printer that supported by my printer can not be detected ....). The message window like this will appear automatically as a recommendation to Diagnose and Repair Printer (if the printer driver is installed before) even this is as a reminder to us who are being careless or forget to connect the printer to the laptop / PC / computer when going to print documents.

Okay, the following is a series of how to diagnose a printer;


1. Select Start

2. Select a program All

3. Select a printer brand

4. My Printer

5. Diagnose and printer repair

6. Next

7. Name and type of printer

8. Repair

9. Test the printer

10. Complete

If this method has been applied to the printer but it still can not printed a document, then do the way the numbers 1 to 4 and then select "setting" (writing is rather small, it is over Diagnose and Repair Printer) and match the type of printer type that will be diagnosed .That sharing of admin, may be helpful. And I'll see you at another time. Insha Allah.

How To Install Printer

Hi Guys , on this auspicious occasion , the admin re- share a post with label " How To " with the title :

HOW TO INSTALL PRINTER

Installing the printer is a tricky affair ; easy for someone who've done it and is still hard for the first try . Therefore, the admin share this post who knows any of readers in need. Okay , the following series of how to install the printer ;

1 . Connect the printer cable to the electrical contacts
2 . Connect the USB printer cable to the laptop / PC / computer
3 . Turn on the laptop / PC / computer
4 . Enter the CD / DVD / flash that contains the printer driver ( driver can be found in computer shops or on the internet via download way )
5 . Copy and paste the printer driver to a folder on the laptop ( preferably to a local disk c because the printer driver includes the program . While local disk D should be filled with the files other program )
6 . Open start ( show desktop shortcut or if the control panel icon has appeared on the desktop )
7 . Select the control panel
8 . Select hardware and sound
9 . Select add printer
10 . Select add local printer
11 . Choose Lpt : 1 ( printer port )
12 . Select the next
13 . Select have disk
14 . Select browse
15 . Open the folder that contains the printer driver before ( if the driver was not in the copy and paste , can now copy and paste )
16 . Select use the driver that is currently installed
17 . Select the next
18 . Wait for the install process is complete
19 . Test the printer
20 . Finish
21 . Test to print document
22 . Completed

Note :

If the printer can not print documents , trying to do diagnose printer .

That sharing of admin for you all , may be helpful . Okay , see you later. Insha Allah .

Wednesday, January 22, 2014

How To Transact And Transfer Money Via BNI SMS Banking

HOW TO TRANSACT AND TRANSFER MONEY VIA BNI SMS BANKING

Transfering money via SMS Banking is the one way to do money transactions that's so indulge us . Because the only type on mobile phone from bedroom though , money can get into the hands of people that we are headed . Nevertheless , there are still some things that need to be done before , during and after the transaction .
The things required before the transaction , namely :
1 . We must have an active BNI account number 
2.  We must have a valid BNI ATM card
2 . We must register our mobile phone number at an ATM machine or bank teller through
3 . We must store the SMS Banking PIN number because it is required during the transaction
While the thing required when doing the transaction is only one, namely : following SMS format it's set by the particular banking system .
 These are the formats of BNI SMS Banking transactions
1 . To check balances , type : SAL send to 3346 . Furthermore, wait for SMS replies from bank operators and follow it .
2 . To find the last transaction , type : HST send to 3346 . and so on .
3 . To charge mobile account , type : TOP <space> MOBILE NUMBER <space> NOMINAL send to 3346 . and so on .
Example : TOP 081234567899 25000 ( account minimum 25,000 and multiples, written without point )
4 . To transfer money among BNI client, type : TRF <space> BANK ACCOUNT NUMBER <space> NOMINAL send to 3346 . Dst .
Example : 0123456789 TRF 100000 ( nominal money also written without points )
5 . To transfer money to other than the BNI client, type TRF <space> ANTARBANK <space> BANK CODE+BANK ACCOUNT NUMBER <space> NOMINAL send to 3346 . Dst .
Example : TRF ANTARBANK 002012345678912345 100000 ( 002 is the code of BRI , 012345678912345 is an account number . 100000 is a nominal 100,000 = written without points )
6 . For more information , text HELP send to 3346
Then, how to transact and transfer money via BRI SMS Banking , please click here
That's all and thank you for visiting this blog. See you next time

20 Code Of Banks In Indonesia

Hi Guys .... ! On this occasion admin wrote a post with the title :

20 CODE OF BANKS IN INDONESIA

As we know that the bank code is usually needed for inter-bank transactions including if the transaction is conducted through ATM machine or SMS Banking . Therefore, the bank code is a necessary thing , so this time admin post this title for you being need it, beside a complement of post before, namely; How To Transact And Transfer Money Via BNI SMS Banking and BRI SMS Banking .

Okay , these are 20 code of banks in Indonesia ......

1. BANK BUKOPIN = 441
2. BANK BUMI PUTERA = 485
3. BANK CENTRAL ASIA (BCA) = 014
4. BANK DANAMON = 011
5. BANK GANESHA = 161
6. BANK MANDIRI = 008
7. BANK MUAMALAT = 147
8. BANK NEGARA INDONESIA (BNI) = 009
9. BANK NIAGA = 022
10. BANK PERMATA = 013
11. BANK RAKYAT INDONESIA (BRI) = 002
12. BANK SINARMAS = 153
13. BANK SYARIAH MANDIRI (BTN) = 451
14. BANK TABUNGAN NEGARA (BTN) = 200
15. BANK TABUNGAN PENSIUNAN NASIONAL (BTPN) = 213
16. BNI SYARIAH = 009
17. BPD KALBAR =123
18. BPD KALSEL =122
19. BPD KALTENG =125
20. BPD KALTIM =124

That's the post , may be helpful , and  see you next time . Insha Allah .

How To Transact And Transfer Money Via BRI SMS Banking

HOW TO TRANSACT AND TRANSFER MONEY VIA BRI SMS BANKING

Transfering money via SMS Banking is one way of money transactions that it's so indulge us . Because the only type in mobile phone from the bedroom though , money can get into the people hand that we are headed . Nevertheless , there are still some things that need to be done before , during and after the transaction .
The things required before the transaction , namely :
1 . We must have an active account number of BRI
2 . We must have a valid BRI ATM card
3 . We must register our mobile phone number at an ATM machine or bank teller through
4 . We must store the SMS Banking PIN number because it is required during the transaction
While the thing required when doing transaction is only one , namely : following SMS format is set by the particular banking system .
 Here is the format of transactions via BRI SMS Banking
1 . To find the balance , type : SALDO PIN send to 3300 . Subsequently, wait for SMS reply from bank operator .
2 . To charge mobile account , type : PULSA <space> MOBILE NUMBER <space> NOMINAL send to 3300 . Dst .
Example : PULSA 081234567899 25 ( account minimum 25,000 and multiplication are written with abbreviated )
3 . To transfer money among BRI client, type :  TRANSFER <space> BRI+ACCOUNT  NUMBER <space> NOMINAL send to 3300 . Dst .
Example : TRANSFER BRI012345678912345 100000 ( nominal money written without points )
4 . To transfer money to other than BRI client, type TRANSFER <space> BANK CODE+ ACCOUNT  NUMBER <space> NOMINAL send to 3300 . Dst .
Example : TRANSFER 0090123456789 100000 ( 009 is the code of BNI , 0123456789 is a bank account number , 100000 is a nominal 100,000 = )
5 . For more information , text HELP send to 3300 .
Then to transact and transfer money via BNI SMS Banking , please click here
That's all from Admin and thank you for visiting this blog. See you next time

Friday, January 17, 2014

How To Print SMS From China Phone

Hi Guys , on this occasion , the admin re- share a post with the label " How To " with the title :


HOW TO PRINT SMS FROM CHINA PHONE

Do you ever think to document the important sms that you received from important person ?Do you ever think to document sms text it self which has important value for you ? Do you ever think to make a note on the phone and want to print it? Do you ever thought in mind to back up sms very unfortunate if deleted ?

If any of the questions above answered Yes , it would be nice if this simple post continues to be read may be it can answer the questions that had occurred earlier . But if all of these questions was answered No, then bring me word about this to those who happen to answer Yes too .Okay , here is how to print sms from china phone which is sometimes called by local phone . This method can be used for them as follows :

1 . To print Received SMS ( Inbox )
2 . To print Sent  SMS ( Sent Box )
3 . To print SMS Concept ( Draft Box )

Received SMS, Sent SMS and Drafts SMS all the three can be documented ( backed up ) on the laptop / computer or printed out at once to put on file should an important official letter or memo using china phone . Of course not all china mobile phone can , the other way , not all non china phone can not. And the characteristics of China mobilephone can to do it has a
default folder is " Message Export " .Message Export is a folder that can be seen in settings file , either in memory hp ( internal ) or on a memory card (external ) . This folder as a place to accommodate ( to back up ) all SMS exported ( moved ) to this folder . In additions, the SMS is already exported can be moved to the folder " Ebook " if you want to read with a little graceful appearance .Then how to print the SMS ?
The trick is as follows :

1 . Go to SMS
Menu 
2 . Choose Received or Sent or Concept SMS
3 . Select Options
4 . Mark the desired SMS ( can be one or some or all of )
5 . Select Options
6 . Select Export SMS
7 . Select to phone or to card
8 . Finish ( moving SMS to folder Message Export ) . then
9 . Open the File Settings Menu
10 . Select Message Export
11 . Select Options
12 . Mark SMS that has been exported
13 . Select Options
14 . Select Send
15 . Select the Bluetooth
16 . Select the Bluetooth name on your Laptop / Computer
17 . Finish ( transfering SMS to laptop ) . then
18 . Open the folder on the laptop that is used to store the file submission via bluetoth
19 . Open the text message that was already formatted " txt " , edit , modif , copy-paste , etc. . ( Depending on taste )
20 . Print
21 . Completed

Note :For those who want to use the Data Cable or Card Reader , ignoring the ways number 11 to 18 but go straight to the Message Export , etc. then Print .That sharing of KM admin for you , hopefully it's useful . Okay , see you later. Insha Allah .

How To Scan And Format Mobile Memory Card

Hi Guys , on this auspicious occasion , the admin re- share a post under category of " How To " with the title :


HOW TO SCAN AND FORMAT MOBILE MEMORY CARD

This method is a follow up of how to resolve any problems of mobile phone memory card ( external memory ) but most  among the sequence way below can also be used to resolve the other memories or flash disk . And this is only to be applied by using a laptop / pc / a certain kind . Okay , here's how to scan and format phone memory ( external ) micro sd . 

To scan , follow the sequence of the way as the following ;

1 . Remove the external memory of mobile phone
2 . Enter into a card reader
3 . Plug the card reader into your laptop / pc
4 . Click start on laptop / pc screen
5 . Choose my computer 
6 . Right click someone name ( G ) 
7 . Select scan
8 . Tick someone name 
9 . Click scan
10 . Wait for the process 
11 . Exit 
12 . Completed

And to format , follow the sequence of the way as the following ;

1 . Follow steps 1-6 above , then 
2 . Choose the format
3 . Tick ​​quick format 
4 . Click on start
5 . Wait for the process
6 . Done .

Then to scan or reformat flash , plug the USB flash disk into the laptop / PC / computer , and follow all of the sequences above except the series of  numbers 1 and 2 on the way to scan .

That
's a sharing of the admin , may be helpful . Okay , thank you for visiting this blog , and see you at another time .