WELCOME TO KIOS MADINAH 3NGLISH VERSION AT HTTP://KIOSMADINAH3.BLOGSPOT.COM


Tuesday, April 24, 2018

How to Type Arabic Text on Android Phone


Hi guys,
All of Kios Madinah Lovers wherever you are!
On this good occasion admin will share a post on Label: Mobile and How To, entitled:

HOW TO TYPE ARABIC ON ANDROID PHONE. 

Generally, we find the Arabic writings in social medias, messenger, BBM, WhatsApp, etc. They were used as profile names, statuses and even someone's personal messages as shown in the screenshots below.


For the people who used to type Arabic every times certainly does not feel foreign with that. But for my friends who never tried that possibly be wondering; How to star it? How and how
Okey, to start Arabic typing or making Arabic text is not too difficult, but vice versa, it is very easy even more simplified.

This was caused the features availability on smart phones and gadgets. Almost all smart phones and gadgets provided that feature, not least Samsung Mini Prime, which that smar phone type was referred by admin take as sample for typing Arabic text on Android smart phone. 

So guys, if your smart phones are not the same brand and type as that, please make an adjustment, especially on the placement settings as will be presented later.

Okey, considering the possibility between Kios Madinah Lovers who want to know how to type Arabic text on Android smat phones, admin will describe the ways as follows:

1. Open your favorite Android phone

2. Find and Click "Settings" (wheel icon)


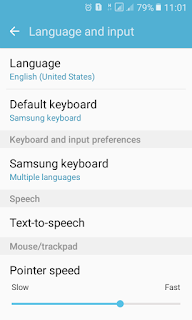
3. Find and Click "Language and Input"

4. Select "Samsung Keyboard"

5. Click the + sign "Add input language"


6. Find and select "Arabic" ( sometimes need internet connection )

7. Save settings

8. Done

Now your smart phone is supporting Arabic input / input and automatically installed the default Arabic font to your Android smart phone.

After that, you can start typing Arabic text. You can try by making an SMS with Arabic input or WhatsApp messages with Arabic text.

For example as the following:

1. Open WA as usual 

2. Start creating a message / chat 

3. Activate the Arabic keyboard by replacing the input of the origin language that appears in the space bar ( keyboard) and then move ( slide ) left or right while pressed so that Arabic input is displayed and the keyboard view as the main picture above.

4. To give a harakah to Arabic letters, select in the dot (.) button on the right side of the spacebar. Then select the best available and most suitable of harakah that you need.

5. To return to previous language input please repeat the way number 4. 

6. For Android phone which doesn't provide features as above, download "Arabic Keyboard" in App or Play Store as alternative then install and activate it. 

7. Done

Thus the post How to type Arabic on Android phone, may be helpful and useful for us all. Okey, Happy typing Arabic text, thanks. And see you.

Thursday, March 3, 2016

Animated Gif " Book Matches " For Mobile


Hi Guys, the lovers of mobile gif animations wherever you are, this time admin reupload animated :: "Book Matches" to use for wallpapers or screensavers or other display on mobile. There are 4 choices of resolution 176x220, 220x176, and 320x240 240x320 which allows you to select one of them adapted to the screen resolution of your mobile phone. If you interested, save / download it/them please for free. Okay, Here they are for you ....

matches - 176x220

matches - 220x176

matches - 240x320

matches - 320x240
That are the animations, hopefully pleasing. But, if the animations on this blog appears not support (not motion) on your mobile, you should view by web versions or common pages on browser. Then, admin hope you to visit this blog frequently because there will be more interesting animations. God willing. Next, bear in mind, it’s the link of this blog (kiosmadinah3.blogspot.com) .
Okey, Thanks for your visiting this blog. And see you next time. Bye Bye ...


Shared By: KiosMadinah

Thursday, November 19, 2015

How To Make Emergency Lights Powered By Laptop

Hi Guys, on this auspicious occasion, admin re-share a post with the label " How To " with the title:

HOW TO MAKE EMERGENCY LIGHTS POWERED BY LAPTOP

Emergency lights or emergency lamp was often needed when electric power was failure or when you want to find something in the dark. This lamp types and brands already circulating in the market from small to large and from cheap to expensive. The marketing system was also assortment from beeing displayed in the window electronics store until being peddled door to door and from paying by installments until to cash.


That indicates that the emergency lamp is very important to be owned in each house at least one lights for used in emergencies. But what if the one lamp that we own turned out to be broken and has not had time yet to buy a new one? Or existing new but broken lamp still unemployed?

Okay, while searching for answers to the above questions, here the admin will share how to make the emergency light that really emergency but very useful especially when a sudden electric power failure and no generator or alternative of electric power source. While the existing emergency lights were low battery and intractable to be charged. While one new lamp would be brought our children to learning group. Fortunately laptop battery power indication with 77% remaining. Wow!

Facing such that situation, while the work being piled up, we may not dissolve in aggravation and despair. But it would be nice if we apply the method to make emergency light powered by laptop as will be described later.

Before making a circuit lamp, materials to be prepared include:
. Broken emergency lights (so long as LED lights still good)
. Screwdriver (size appropriate casing bolts of lamp)
. USB socket ex-mobile phone charger or unused data cable

And among term used as shown in this picture:


Then,  do as following:
1. Remove the screws on the lamp casing
2. Open the casing carefully
3. Find both minus and plus cables are connected to the feet of LED lights and ignore the other cables
4. Take USB socket, ex-mobile phone charger following the wire then cut the end part (cut the socket to mobile phone)
5. Connect the black wire on the USB to the minus cable or foot of LED lamp, while the red wire to the plus cableor foot  of LED
6. Ignore the green and yellow wires of the USB cable
7. Arrange the wire connection in order to avoid short circuit
8. Close the casing emergency lamp and replace the screw-bolt
9. Connect the socket USB into the USB port of a laptop
10. Done

Okay, enjoy the brightness of emergency lamp using laptop power. And survived to continue the work.

Additional:
. To freshen up a connection of circuit, should we use solder (when electric power is on)
. To save battery power of laptop, should we use LED lights at sufficiently (do not connect all of them or try to use the appropriate resistor)
. LED lights that may remain, can be used as a second emergency lights etc., are arranged in parallel
. For about casing of second emergency light etc., can be modified depend on desire
. To switch on emergency lamp can also use the power bank or mobile battery or digital camera battery or 2 batteries of clock / remote arranged in series, or other batteries with has power between 3 to 4 volts (appropriate to the amount and voltage of LED lights are used ).

That sharing of admin to buddy-buddy KM everything, may be helpful. Okay, thank you and see you at another time. Insha Allah.

Friday, September 4, 2015

4 Alternatives To Recharge Mobile Phone When Electric Power Failure

Hi, Kios Madinah readers! on this auspicious occasion, admin re-share a post with the label "How To" with the title:

4 ALTERNATIVES TO RECHARGE MOBILE PHONE WHEN ELECTRIC POWER FAILURE

In general, a failure of electric power was sucks, whether in daylight let alone at night. However, this situation seemed to definitely have to happen given the generators following the installation of upstream to downstream may not have experienced wear and tear, damaged, replaced or repaired which it is what requires blackouts, temporary, periodic, rotating, etc. ,

When the lights in this way we can not use electronic devices which use electrical energy source. We also can not use communication tools such as mobile phone (handphone), BB (blackberry), or gadgets like them when the battery is low or used up.

In anticipation of these circumstances, it is better if we try 4 alternatives to recharge mobile phone when the lights failure, as will be described below. Okay, these are the 4 alternatives in question:

1. Using Genset

We already know that the generator is a power plant with fuel oil and can generate electric energy according to their capacities. Therefore, the generator can be used as an alternative electric energy producer in when the electric power off or falure.

Furthermore, we just turn on the generator, connect it to the charger, plug it into the phone, waiting for the charging process. Done.

2. Using Power Bank

Power Bank is a tool to accommodate electrical energy which the battery energy can be transferred to mobile phone or Black Berry or the other gadgets. There are many types and brands of Power Bank sold at phone counters around us. We just choose which best suits our needs or desires.

Furthermore, we charge the Power Bank at electric power was on then we use to charge the phone when the electric power off. Oh yes, the Power Bank is also well brought while we were traveling in case low battery on our mobile phone.

3. Using Laptop

Laptops that have functions similar to a PC or a computer it can be used for phone recharging. In terms of function is almost no difference. And a striking difference among them here, the laptop can accommodate the electrical energy obtained from the socket to power station or the generator or other power plants, while computers are generally not. Then the laptop can also be used as an alternative to recharge mobile phone, but not to computers in general.

Therefore, we should always maintain availability power of laptop battery when electric power was on, so that can be used as a charger when it’s off.

Furthermore, we simply connect our mobile or BB USB to a laptop using a data cable or ordinary charge cable, wait for the charging process is running, until finished.

4. Using a Battery Backup

A battery backup is a spare battery that has the same size, type, capacity and function as a battery is being used on mobile phone or BlackBerry. This backup battery can be charged in advance by mobile phone or BlackBerry or through external charger. Then placed it in a safe place for use when needed, for example when a blackout.

As for how to use it seems to have no need to be discussed here. So, just give it a try.

That’s a sharing of admin to KM readers, everything may be helpful. Okay, thank you and see you at another time. Insha Allah.

Wednesday, December 17, 2014

How To Photocopy Back And Forth On Printer

Hi Guys, on this auspicious occasion, the admin come back again to share a post with the label "How To" with the title:

HOW TO PHOTOCOPY
BACK AND FORTH ON PRINTER
(to be applied to the printer Canon MP 237 or similar)

How to Photocopy on Printer? Here will be described more detail how to photocopy
back and forth ID card, driving license, ID Cards, Employee Cards, Student Card or the Similarly, the way is different from the common photocopy  to F4 or A4 sized documents such as diplomas and certificates.

Yes, to photograph the copy back and forth cards as above is required
more accuracy  and enough experience or frequency of trying. Because if being is not, then the result of a copy will be contiguous or overlapping and in essence that is failing. And what is the solution?

Maybe these ways below as the answer, besides to the other that more professional and educational. Okay, the following are the
ways to copy of ID card back and forth on printer:

1. Tur on printer by plugging the printer power cable to stop contact and then press the "POWER"
2. Open the lid (bonnet) at the top of the printer
3. Enter a blank paper (paper back-up)
4. Open a middle cover (hood scanner) on the printer
5. Put dawn ID card on the top left side, faced to the left, then copy (front side will be copied faced to down), and then close the hood to make the results are clean.
6. Press the "BLACK" to copy a black copy and press "COLOUR" to copy a color copy.
7. Wait for process. (For black copy just in seconds, but for color copy can be up to a few minutes)
8. Enter again (paper) of copy results with a blank page in the front position, and faced down (part of paper contains an existing of copy results included first)
9. Invert the ID card (the original ID card that is still in the printer to process a copy of the back side), and move its location on the lower left side, faced to the left, and copy it again.
10. Good Luck

That sharing of admin, may be helpful and success always be with us. Amen. Okay, see you in the future with the latest postings. Insha allah.


THANK'S FOR READING "HOW TO COPY BACK AND FORTH ON PRINTER"